
Built-in microwaves create an unusual measurement problem. The number printed most prominently in a product description — 24 inches, 27 inches or 30 inches — may describe only one part of the installation. It might refer to the appliance front, the trim kit, the cabinet class or another external dimension. Behind that visible rectangle sits a different geometry of cutouts, ducts, vents, electrical hardware and clearances.
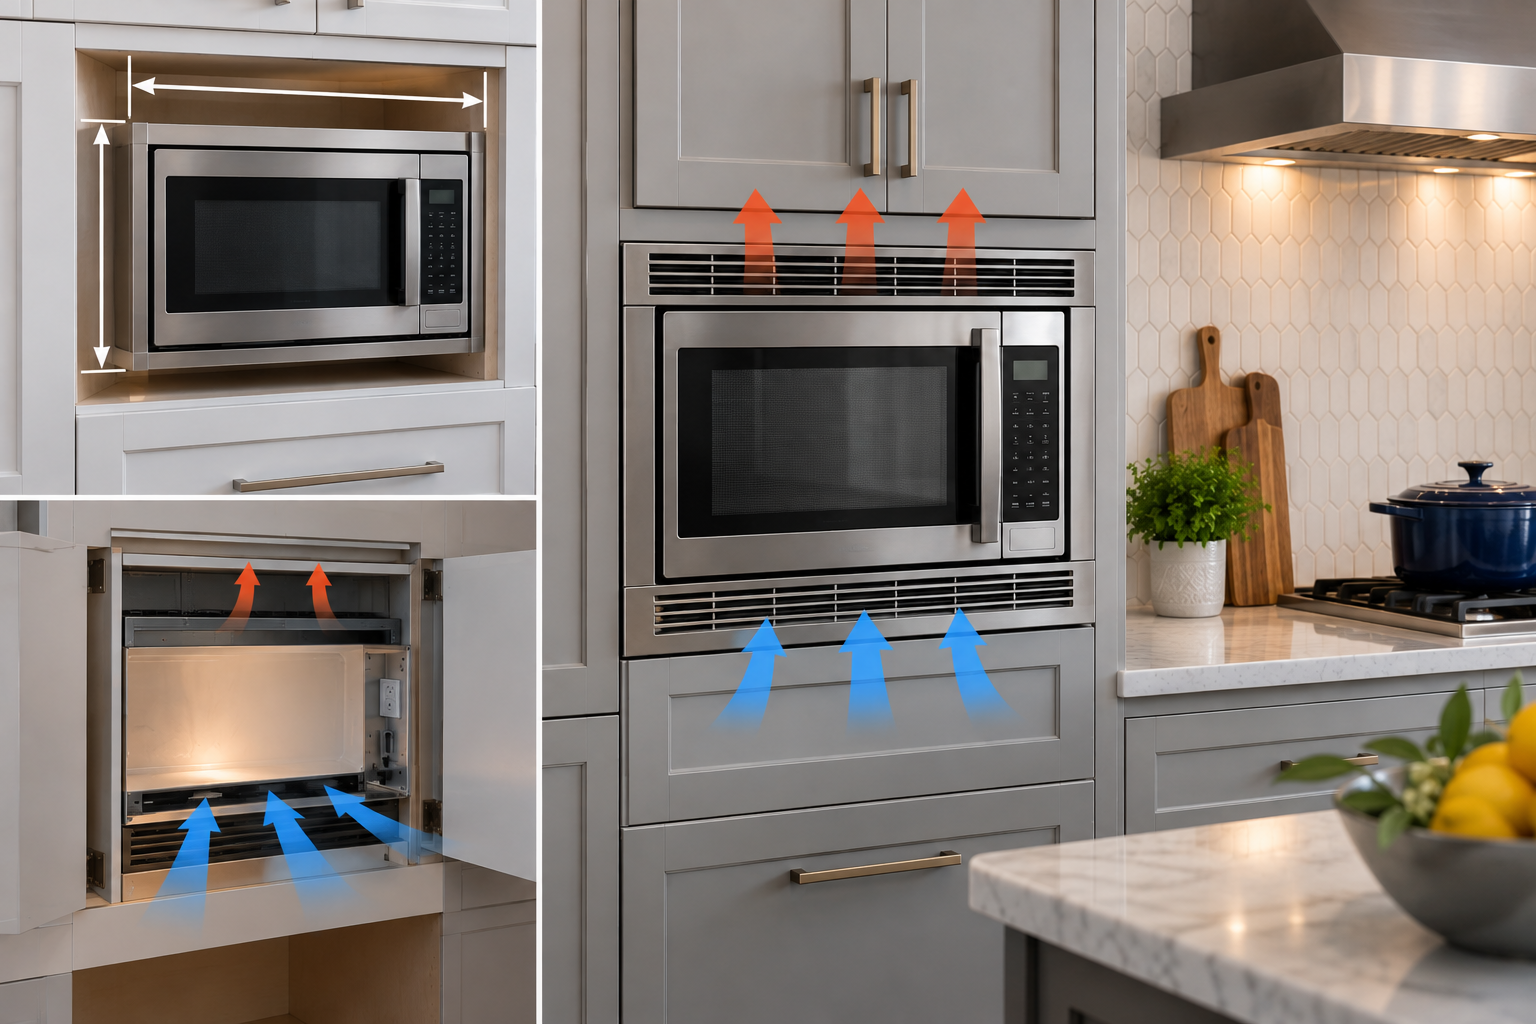
That distinction explains why replacing a built-in microwave can become unexpectedly complicated. Two appliances can look similar from across a kitchen while requiring different cabinet openings. A microwave can physically slide into a cavity yet still be installed incorrectly because its ventilation path is obstructed. A trim frame can measure 30 inches wide while surrounding an appliance body considerably narrower than 30 inches.
Sizing and ventilation are therefore connected rather than separate purchasing questions. The cabinet has to provide enough room for the appliance and whatever airflow system its manufacturer specifies.
A reliable microwave buying guide should treat the installation drawing as seriously as wattage, capacity or cooking programs. For built-in models, the drawing is effectively part of the appliance.
Built-In Microwave Size Is Not One Measurement
The phrase “microwave size” sounds singular. In practice, several measurements can be involved:
- Overall appliance width.
- Overall appliance height.
- Overall appliance depth.
- Cabinet cutout width.
- Cabinet cutout height.
- Minimum cabinet depth.
- Trim-frame width and height.
- Required clearances.
- Door or drawer operating clearance.
- Electrical-receptacle space.
- Ventilation space or duct dimensions.
Confusing any two of these measurements can derail an installation.
A nominally 30-inch trim kit, for example, does not necessarily require a 30-inch-wide hole in the cabinet. The visible frame can extend beyond the cutout so that it covers the opening and coordinates visually with neighboring cabinetry or a wall oven.
GE Appliances makes this distinction explicit. Its guidance for built-in-capable countertop microwaves says that compatible models may use 27-inch or 30-inch trim kits, while the difference between those kits can reside in the trim frame rather than the microwave itself. The company also states that the overall height of a microwave includes its feet, while only the front face is visible through the trim opening.
The lesson is practical: advertised dimensions cannot substitute for an installation diagram.
There Are Several Types of “Built-In” Microwave
The built-in category itself needs to be separated into different installation formats.
A kitchen may contain:
- A microwave manufactured specifically for built-in installation.
- A countertop microwave approved for cabinet installation with a dedicated trim kit.
- A microwave drawer.
- A microwave integrated into a combination appliance.
- An over-the-range microwave, which uses a different mounting and ventilation strategy.
These appliances should not be treated as variations of the same installation.
GE identifies three broad built-in approaches in its replacement guidance: built-in-capable countertop models using trim kits, built-in-only models and microwave drawers.
The distinction matters because ventilation architecture changes with the product.
A purpose-built microwave may incorporate its airflow requirements into the cabinet installation. A countertop-derived model may rely on ducts supplied with a trim kit. A microwave drawer has a different body orientation and mechanical arrangement.
The phrase “it fits” therefore needs qualification. It should mean the exact model fits the exact opening while meeting its specified mounting, electrical and airflow requirements.
Anything less is guesswork.
Cabinet Cutout Dimensions Matter More Than Nominal Width
Cabinet cutout dimensions are the measurements of the finished opening into which the appliance and its installation hardware must fit.
These figures deserve priority over nominal product width.
A cabinet described as 30 inches wide will not normally provide a 30-inch clear internal opening. Cabinet walls, face frames and construction details consume part of that dimension.
Likewise, a microwave associated with a 30-inch trim kit may use a much narrower cutout.
A published JennAir planning document provides a useful illustration. For one built-in/countertop microwave configuration, the required cutout width is 23 1/8 inches, while compatible trim kits have overall widths of approximately 29 3/4 inches or 26 7/8 inches. The same planning document specifies a cutout height between 17 and 17 1/8 inches and a minimum cutout depth of 22 3/4 inches.
Those measurements apply only to that particular configuration. They demonstrate something broader: visible trim size and cabinet cutout size can differ substantially.
That is why homeowners replacing an existing built-in microwave should measure behind the trim whenever practical rather than assuming the visible frame describes the opening.
Width Should Be Measured at More Than One Point
A cabinet opening can look square without actually being square.
Measure width at the top, middle and bottom of the opening.
If those measurements differ, record all three. The smallest usable dimension can become the limiting figure, subject to the manufacturer’s specified tolerances.
This becomes especially important in older cabinetry, remodeled kitchens or openings that have been altered for previous appliances.
Rounding should be avoided.
A measurement of 23 1/16 inches is not 23 1/4 inches merely because the difference appears small. Installation hardware can be surprisingly unforgiving, particularly when trim pieces have to align with screw locations or surrounding cabinet faces.
The tape measure is not estimating. It is documenting.
Height Can Be Just as Restrictive
Height is sometimes treated as secondary because microwaves are visually dominated by their width.
Cabinet installation does not share that bias.
The vertical opening may have minimum and maximum requirements. Trim frames can extend above and below the cutout. Mounting rails or ducts may consume additional space.
The JennAir planning example illustrates how narrow an acceptable range can become: its documented cutout height is 17 to 17 1/8 inches.
A difference of one-eighth inch is visually trivial in a kitchen. Mechanically, it can determine whether an installation matches the specification.
Height should therefore be measured at the left side, center and right side of the opening.
The cabinet floor should also be checked for level.
A tilted support surface can affect alignment between the appliance face, trim frame and adjacent cabinetry. With a microwave drawer, it can also affect how the appliance visually aligns with nearby drawer fronts.
Built-in work rewards precision because the appliance becomes part of the cabinet elevation rather than an independent object sitting on a counter.
Depth Is More Complicated Than It Looks
Depth appears straightforward until the electrical receptacle enters the cavity.
A cabinet may measure 23 inches from front to back, yet not provide 23 inches of usable appliance space.
Several things can reduce effective depth:
- A surface-mounted electrical receptacle.
- The microwave plug.
- Cord routing.
- Cabinet back panels.
- Mounting hardware.
- Duct components.
- Structural rails.
- Required rear clearance.
This is why installation instructions sometimes specify both cabinet depth and acceptable receptacle locations.
The correct measurement begins at the installation plane defined by the manufacturer and ends at the first meaningful obstruction, not automatically at the rear wall.
That distinction can prevent an irritating scenario in which the microwave almost fits but projects beyond the intended cabinet line because the plug consumes the final inch of space.
“Almost” has little value when a trim frame needs to sit flush.
Ventilation Is Part of the Installation System
Microwave ventilation is often misunderstood because the appliance does not produce smoke in the same manner as a cooktop.
Yet the microwave’s electrical components and cooking process generate heat that has to be managed.
Countertop microwaves commonly have intake and exhaust openings on their cases. Those vents are exposed when the appliance sits freely on a counter.
Place the same appliance inside cabinetry and the environment changes.
GE states that built-in trim kits provide the airflow required for compatible countertop microwaves. Its kits include a trim frame along with upper, lower and rear ducting that surrounds the microwave inside the cabinet opening. GE warns that enclosing a countertop microwave without its appropriate built-in kit can prevent proper airflow, potentially leading to overheating, shutdown or component problems.
That makes the trim kit part of the thermal design.
Calling it decorative understates its job.
A Trim Kit Is More Than a Metal Frame
A trim kit visually fills the gap between an appliance and a larger cabinet opening, but appearance is only one function.
Depending on the model, the kit may include:
- A front trim frame.
- Upper ducting.
- Lower ducting.
- Rear ducting.
- Mounting rails.
- Brackets.
- Screws and other mounting hardware.
Whirlpool similarly explains that microwave trim kits are generally model-specific and should be selected with proper airflow in mind.
This model specificity is significant.
Two microwave bodies may have similar dimensions but place their vents in different locations. A duct system engineered for one model may not route air correctly around another.
That is why an old trim kit should not automatically be reused with a new microwave simply because the new appliance fits through the frame.
Physical fit and approved compatibility are different standards.
Countertop Microwaves Cannot Automatically Become Built-Ins
One of the more persistent installation assumptions is that any countertop microwave can become built-in if a cabinet opening is large enough.
That is unsafe reasoning.
GE states that only selected countertop models are approved for built-in installation and require the trim kit designed for the specific model.
The reason returns to airflow.
A countertop microwave assumes surrounding open space according to its installation requirements. Enclosing it alters the thermal environment.
An approved built-in configuration accounts for that change through specified clearances, ducts or other installation provisions.
This does not mean every microwave installed in cabinetry requires the same type of trim kit. Purpose-built models can have their own ventilation design.
It means the manufacturer’s approved installation method determines how the appliance should be enclosed.
Cabinet dimensions alone cannot answer that question.
Ventilation Does Not Mean Every Microwave Needs an Exterior Duct
Microwave ventilation is easily confused with range-hood ventilation.
They are not always the same issue.
A built-in microwave needs airflow for its own operation, but that does not automatically mean it needs a duct running outdoors.
Over-the-range microwaves can incorporate cooktop exhaust systems and may be configured for external venting or recirculation depending on the model and installation.
A built-in microwave placed in a wall cabinet generally addresses appliance cooling rather than serving as the primary exhaust hood for a cooktop.
The installation manual determines the required arrangement.
This distinction matters during renovation because homeowners sometimes see the word “ventilation” and assume a new exterior duct must be added. Others make the opposite mistake and assume ventilation can be ignored because there is no range below the appliance.
Neither assumption is reliable.
Airflow requirements belong to the exact product.
Microwave Drawers Follow Different Geometry
Microwave drawers change the installation problem again.
Instead of opening through a side-hinged front door, the cooking cavity moves outward horizontally.
Sharp’s installation manual for its SMD2470AS, SMD2470AH and SMD3070AS microwave drawers provides separate clearance diagrams for 24-inch and 30-inch configurations and warns against installing the drawer in combustible cabinetry that does not comply with the stated clearances and dimensions.
That documentation illustrates why a drawer should never be planned solely from its visible front width.
The cabinet has to support the appliance body, provide the specified clearances, accommodate electrical requirements and allow the drawer to extend into the room.
Operating clearance therefore becomes part of sizing.
A drawer can fit perfectly inside its cabinet while becoming unusable because a nearby handle, island seat or opposing appliance blocks its travel.
The installation must be measured in motion.
Drawer Support and Anti-Tip Provisions Matter
A microwave drawer is not simply a conventional microwave turned sideways.
The moving mechanism places different demands on the cabinet structure.
Manufacturer installation instructions can require specific support and anti-tip provisions. Those requirements affect cabinet construction before the appliance is inserted.
This is particularly relevant in custom cabinetry.
A cabinetmaker given only the appliance’s outside dimensions may produce an opening that looks correct but lacks a required support surface or anti-tip location.
The installation manual should therefore be part of the cabinet specification package.
This principle extends beyond drawers. Built-in appliances are systems involving appliance, cabinet, power supply, mounting hardware and clearances.
Treating only the metal box as the product ignores much of what makes installation successful.
Electrical Placement Can Change Usable Space
Electrical requirements are usually discussed as voltage and amperage, but receptacle location also affects physical fit.
A plug has depth.
So does a receptacle projecting from a wall.
If either sits directly behind the deepest part of the microwave, the appliance may be prevented from sliding fully into position.
Some installation diagrams identify a preferred electrical-supply region specifically to avoid that conflict.
Before cabinetry is finalized, record:
- Receptacle width and height.
- Distance from the cabinet floor.
- Distance from a side wall.
- Whether the receptacle is flush or surface-mounted.
- Cord-routing space.
- Whether mounting or duct components share the same area.
Electrical placement should be designed alongside cabinet dimensions rather than addressed after the opening is finished.
A perfectly sized cutout can still fail because the plug has nowhere to go.
Replacement Projects Need More Measurements Than New Construction
New construction offers flexibility. The cabinet can often be designed around the chosen microwave.
Replacement work reverses the relationship.
The opening already exists.
GE advises replacement buyers to check whether the new microwave is built-in capable, whether its cabinet cutout requirement matches the existing installation and which trim-kit width is required.
That process should begin before the old appliance is discarded.
Record its model number and trim-kit information. Photograph the installation. Once accessible, measure the actual opening rather than relying on the old microwave’s exterior dimensions.
The useful replacement measurements include:
- Cutout width.
- Cutout height.
- Minimum usable depth.
- Existing trim dimensions.
- Receptacle location.
- Distance to adjacent walls.
- Clearance to nearby cabinet doors.
- Available door-swing or drawer-extension space.
The old trim frame can conceal considerable information. Removing it often reveals that the cabinet opening bears little resemblance to the nominal width advertised on the front of the appliance.
Bigger Openings Are Not Automatically Better
A common instinct says that an undersized opening is a problem while an oversized opening is harmless.
Built-in installation is less forgiving.
An opening that is too large can interfere with mounting points, leave trim without adequate material for fastening or create visible gaps.
Manufacturers can specify both minimum and maximum cutout dimensions for this reason.
The objective is not simply to create enough empty volume.
The objective is to create the particular opening the installation system expects.
That distinction becomes especially important when cabinetry is fabricated before the final appliance model is selected.
Leaving an arbitrary “large enough” cavity can create additional carpentry later.
The safer approach is to choose the appliance family first, obtain the installation drawing and construct the opening from those dimensions.
Landing Space Belongs in the Sizing Discussion
A microwave can fit its cabinet and still be positioned badly.
Food entering the appliance eventually has to leave it, sometimes extremely hot.
The National Kitchen & Bath Association recommends at least 15 inches of landing area above, below or adjacent to the handle side of a microwave. Its accessibility guidance recommends landing space in front of or immediately adjacent to the handle side.
That guidance expands the meaning of microwave sizing.
The appliance footprint is only one part of the working area.
A microwave installed at the edge of a tall cabinet with no nearby countertop may satisfy the manufacturer’s cutout dimensions while producing an awkward transfer for hot cookware.
A drawer beneath an island worktop can provide a shorter path from cavity to landing surface.
The surrounding counter should therefore be measured along with the cabinet opening.
Kitchen planning concerns movement as much as millimeters.
Installation Height Is Another Dimension
Width, height and depth describe the opening. Installation height describes the relationship between the appliance and the user.
That relationship matters.
A microwave mounted high in a tall cabinet may require users to lift hot containers near face level. A drawer installed very low can require more bending.
Control visibility also changes with height.
Before cabinetry is finalized, the proposed appliance position can be marked with removable tape. Users can simulate loading and unloading a large dish at that height.
This physical rehearsal costs nothing and can expose ergonomic problems before they become permanent.
The same approach works for microwave drawers. Mark the drawer face, estimate its extension and simulate lowering cookware into the cavity.
A kitchen elevation drawing cannot communicate every movement the body will make.
Door Swing Needs Its Own Clearance
Conventional built-in microwaves add another measurement: door movement.
A cabinet cutout may be perfect while a neighboring wall prevents the microwave door from opening comfortably.
Corner installations are particularly vulnerable.
Nearby refrigerator handles, oven handles and cabinet pulls can also create interference.
Measure from the appliance face to adjacent perpendicular surfaces and compare that distance with the manufacturer’s door-clearance requirements.
For drawer models, perform the equivalent check using full drawer extension.
The installation should be evaluated as a moving object rather than a static rectangle.
This becomes even more important in compact kitchens, where appliances frequently share circulation space.
Ventilation Openings Should Never Become Storage Space
Once a built-in microwave is installed, the empty areas around it can appear wasteful.
That perception can encourage later modifications: extra trim, stored objects, insulation or cabinet alterations.
Such changes should not obstruct spaces designated for airflow.
Ventilation clearance is functional space.
Its value is invisible precisely because air occupies it rather than cookware.
If an installation uses ducts supplied with a trim kit, those ducts should remain in the configuration specified by the manufacturer. If a manual requires open clearance around a component, that space should remain open.
A cabinet that appears more tightly finished is not necessarily better engineered.
Sometimes the empty area is doing the work.
How to Read a Microwave Installation Drawing
Installation drawings become much easier to use when read systematically.
Start by separating appliance dimensions from cutout dimensions.
Then identify:
- Minimum and maximum cutout width.
- Minimum and maximum cutout height.
- Required depth.
- Trim-frame dimensions.
- Electrical-supply location.
- Minimum clearances.
- Mounting locations.
- Ventilation ducts or airflow spaces.
- Support requirements.
- Door or drawer operating dimensions.
- Requirements involving nearby ovens or cabinetry.
Do not assume a letter such as A, B or C means the same thing across different manufacturers. Follow the legend on the specific drawing.
Also check whether dimensions refer to finished surfaces.
Cabinet openings can change after panels, face frames or decorative material are installed.
The final measurement should describe the finished cavity the appliance will actually encounter.
A Practical Pre-Purchase Measurement Checklist
Before ordering a built-in microwave, the kitchen should be documented with enough precision that the installation drawing can be checked line by line.
Record:
- Opening width at the top, center and bottom.
- Opening height at the left, center and right.
- Minimum usable depth.
- Receptacle dimensions and exact location.
- Nearby wall clearances.
- Adjacent cabinet-handle projections.
- Door-swing or drawer-extension space.
- Landing-area dimensions.
- Cabinet support construction.
- Existing trim dimensions during replacement work.
- Existing appliance and trim-kit model numbers.
- Photographs of the opening.
- Exact model number under consideration.
- Exact compatible trim-kit number, where required.
These figures should be recorded rather than remembered.
For especially tight dimensions, a photograph of the tape measure in position can provide useful confirmation for an installer or cabinetmaker.
Measurement documentation is inexpensive. Cabinet correction is not.
Why Generic Sizing Charts Have Limited Value
Generic charts can help explain common microwave categories, but they should not be used as installation specifications.
Manufacturers alter cabinet requirements across models, even when appliances share similar advertised widths.
Vent locations change. Trim systems change. Electrical positions change. Mounting arrangements change.
A generic chart can therefore answer a broad question such as whether a kitchen is likely to have enough space for a certain class of appliance.
It cannot reliably determine whether a specific model fits a specific cutout.
That determination belongs to the model-specific installation document.
The more integrated the appliance, the more important this becomes.
Countertop microwaves tolerate relocation. Built-in microwaves turn measurement errors into carpentry.
Sizing and Ventilation Should Be Evaluated Together
The central mistake in built-in microwave planning is treating cabinet size and ventilation as independent subjects.
They are parts of the same installation geometry.
The cavity has to contain the appliance while preserving the spaces, ducts and clearances required for airflow. The electrical connection has to fit without displacing the microwave. Trim has to cover the opening without obstructing vents. Doors or drawers have to move without colliding with surrounding cabinetry.
A dimension can therefore be structurally adequate yet thermally inadequate.
That is why merely proving that the microwave body fits is insufficient.
A proper fit means the entire approved installation fits.
Final Considerations
Built-in microwave sizing becomes much easier once the idea of a single “microwave size” is abandoned.
There is an appliance size, a cabinet cutout, a visible trim size, an electrical zone, an operating envelope and a ventilation arrangement. Those measurements overlap, but they are not interchangeable.
The cabinet cutout deserves particular attention because nominal widths can be misleading. A 27-inch or 30-inch trim frame can surround a considerably narrower opening. Width and height should be measured at several points, while usable depth should account for plugs, receptacles, ducts and structural obstructions.
Ventilation belongs in the same calculation.
A countertop microwave approved for built-in use may rely on a model-specific trim kit to route air correctly around the appliance. GE explicitly warns that enclosing countertop microwaves without the appropriate built-in system can obstruct airflow and lead to overheating or shutdown. Whirlpool likewise directs buyers toward compatible kits and model-specific ventilation instructions.
That makes improvised trim a poor substitute for approved installation hardware.
Microwave drawers require a different approach. Their cabinet openings, support provisions, anti-tip requirements and forward movement have to be considered together. A drawer that fits while closed can still conflict with an opposing cabinet, handle or traffic path when open.
Replacement projects deserve particular discipline because the existing cabinet is already fixed. The old trim should not be treated as proof that a new microwave will fit. The actual opening, receptacle and clearances should be measured and compared directly with the new model’s installation document.
The surrounding kitchen also matters. NKBA’s recommendation for at least 15 inches of microwave landing area is a reminder that successful sizing extends beyond the cabinet opening. Hot cookware needs a nearby destination, and installation height influences how comfortably that cookware can be moved.
The most reliable purchasing sequence is therefore remarkably unglamorous: identify the exact model, obtain its installation instructions, measure the finished opening, locate the electrical connection, document moving clearances, confirm the ventilation arrangement and compare every figure line by line.
Only after those questions are settled do capacity, wattage, sensors, finishes and interface features deserve priority.
A disciplined microwave buying guide treats the empty spaces around a built-in microwave as deliberately as the appliance itself. Some of those spaces accommodate trim. Some permit movement. Some contain electrical hardware. Others exist simply so air can move where the manufacturer intended.
None should be dismissed as wasted space.
A built-in microwave succeeds when the appliance, cabinet, electrical connection and airflow system operate as one installation. Measuring only the visible metal box captures only part of that system — and usually not the part most likely to cause trouble after delivery.